Exercise: Moving Pattern
So far we’ve talked about simple drawing with shapes, in which you define each elements characteristics manually. We expanded on this by loading images into our sketches and using variables to randomly assign them.
In this exercise we’ll introduce additional coding concepts and logic – specifically we’ll use a For Loop to make conditional designs that leverage logic and routines so we don’t need to make every decision ourselves in code. Implicitly this checks a true or false condition, and runs our code while that condition is true.
Random Composition
First, create a new p5.js (I named mine "pattern"). Then let’s start by making a 1080 canvas, and drawing some simple shapes in the center:
function setup() {
 createCanvas(1080, 1080);
 noStroke();
}

function draw(){
 background(2255,255,220);
 fill('orange');
 circle(width/2, height/2, 400);

 translate(width/2, height/2);
 fill('pink');
 rectMode(CENTER);
 rect(0, 0, 380, 380);
}
A few things to note… to draw the square we are translating our coordinates to the center of the canvas. Then setting the rectMode to CENTER. This makes it so we draw our rectangle from the center of the shape rather than the top-left.
Next, let’s introduce some random parameters into our sketch by using p5’s built in random function. To do this, we’ll make the size of the circle and square less than 500px, but bigger than 300px, by passing the random function a minimum and a maximum value to find a random number in between. To make a perfect square rather than a rectangle, we will store the “random” value of the square in a variable:
function setup() {
 createCanvas(1080, 1080);
 noStroke();
}

function draw(){
  background(255,255,220);

  fill('orange');
  circle(width/2, height/2, random(300,500));

  translate(width/2, height/2);
  fill('pink');
  rectMode(CENTER);
  const sz = random(300,500);
  rect(0, 0, sz, sz);
}
You can see this is drawing very fast! Let’s set the sketch to noLoop so we can focus on drawing a single composition at a time.
Let’s also add blend modes to our shapes. To do this we will introduce a new concept of push-ing and pop-ing code. This will let us set a state only within the push and pop that begins and ends a series of actions. So, we’ll push our code while drawing the circle, add a blend mode then pop it after so the blend mode doesn’t apply to everything being drawn. We will also do this to the square.
function setup() {
  createCanvas(1080, 1080);
  noStroke();
  noLoop();
}

function draw() {

  background(255,255,220);

  push();
  blendMode(MULTIPLY);
  fill('orange');
  circle(width/2, height/2, random(300,500));
  pop();

  push();
  blendMode(MULTIPLY);
  translate(width/2, height/2);
  fill('pink');
  rectMode(CENTER);
  const sz = random(300,500);
  rect(0, 0, sz, sz);
  pop();
}
Now, let’s adjust this sketch so that it repeats in a grid using a For Loop.
For Loop
This is a bit complicated, so let’s walk through it step by step… First, let’s set the size of each grid cell. To do this, we’ll make a variable that holds the size of the grid. We’ll be thinking of a square grid (equal rows and columns. We’ll then divide our canvas size by the grid value to make the cell size:
const GRID = 2;
const CELL = 1080 / GRID;
We’ll then use a For Loop inside of the draw() function which will let us repeat our code positioning them within our “grid cells”:
function draw() {

  …

  for (let gy = 0; gy < GRID; gy++) {
    const cy = gy * CELL + CELL / 2;

    …

    circle(cy, cy, random(300,500));
 }

 …
A For Loop repeats a set of conditions while they are true, typically incrementing each time. You can think of it as following the logic of: “Start here, keep going while a condition is true, and change something each time.” With the code ending when the condition is no longer true. If we use this as an example:
for (let gy = 0; gy < 5; gy++) {
  console.log(gy);
}
We are saying to set gy to 0, do the loop as long as it’s less than 5, and every time the loop runs add 1 to gy. So, it should run five times.
If we compare it to the the example above:
for (let gy = 0; gy < GRID; gy++) {
We are declaring gy to be 0, checking if it’s less than the number of grid cells – in this case 2, and then adding 1.
The next complex part is positioning each element. In our abbreviated code above we are setting a cy variable. These will be the vertical center of each grid cell being drawn.
const cy = gy * CELL + CELL / 2;
In the first iteration of our loop cy would be defined as:
const cy = 0 * 540 + 540 / 2;
So, cy would equal = 270 (0 * 540 = 0, 540 / 2 = 270, 0 + 270 = 270) and in our the first iteration of our the circle is being positioned at x = 270, y = 270.
If we use the example of the second time the loop runs (y = 1), this means cy would equal = 810 (1 * 540 = 540, 540 / 2 = 270, 540 + 270 = 810)
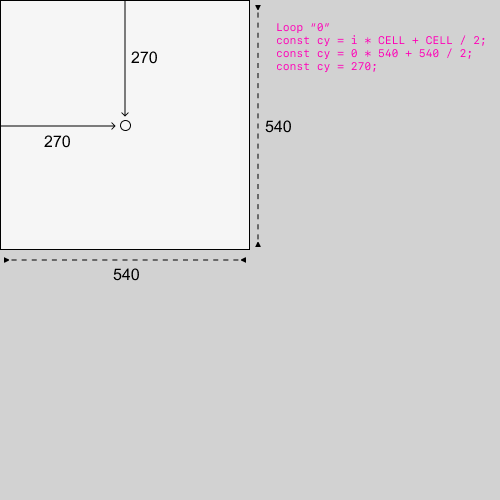
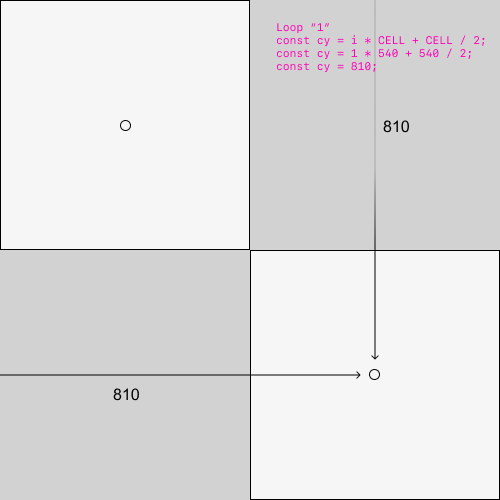
Illustration showing how the For Loop defines an elements position
Now, we can see how the loop enables structured, modular, drawing. Let’s check our full, updated code:
const GRID = 2;
const CELL = 1080 / GRID;

function setup() {
 createCanvas(1080, 1080);
 noStroke();
 noLoop();
}

function draw() {
 background(255, 255, 220);

 for (let gy = 0; gy < GRID; gy++) {

   const cy = gy * CELL + CELL / 2;

   push();
   blendMode(MULTIPLY);
   fill('yellow');
   circle(cy, cy, random(300, 500));
   pop();

   push();
   blendMode(MULTIPLY);
   translate(cy, cy);
   fill('pink');
   rectMode(CENTER);
   const sz = random(300, 500);
   rect(0, 0, sz, sz);
   pop();
 }
}
However, as you can see we are only defining our grid along one axis. So, we will make a nested loop, and introduce another variable for the x coordinate of each shape. Our code would look something like this:
  for (let gy = 0; gy < GRID; gy++) {
    for (let gx = 0; gx < GRID; gx++) {
     const cx = gx * CELL + CELL / 2;
     const cy = gy * CELL + CELL / 2;
     …
     circle(cx, cy, random(300, 500));
     …
     translate(cx, cy);
   }
  }
In this case the gy loop runs once, then the gx loop runs twice, totalling 4 different modules. Let’s make a couple of adjustments to our code to make it more easily adjustable…
Let’s make variables for the size of our circle and square outside of the For Loop, so they are easier to access. Let’s also set the upper bounds of their size to the CELL value.
Our full code would look something like:
const GRID = 2;
const CELL = 1080 / GRID;

function setup() {
 createCanvas(1080, 1080);
 noStroke();
 // frameRate(2);
 noLoop();
}

function draw() {
 background(255, 255, 220);
 const cz = random(40, CELL);
 const sz = random(40, CELL);

 for (let gy = 0; gy < GRID; gy++) {

   for (let gx = 0; gx < GRID; gx++) {
     const cx = gx * CELL + CELL / 2;
     const cy = gy * CELL + CELL / 2;

     push();
     blendMode(MULTIPLY);
     fill('orange');
     circle(cx, cy, cz);
     pop();

     push();
     blendMode(MULTIPLY);
     translate(cx, cy);
     fill('pink');
     rectMode(CENTER);
     rect(0, 0, sz, sz);
     pop();
   }
 }
}
This means if we adjust the value of GRID at the beginning of the sketch, our shapes will scale to fit the new CELL size.
Let’s change noLoop(); -> to frameRate(6); which changes the number of animation per second. Now you should have a moving animation!
Finally, let's make it so we can easily save our sketch as a GIF, by adding this code that responds to a keypress by the user at the bottom of your document:
function keyPressed() {
  if (key === 's') {
    saveGif('mySketch', 5);
  }
}
Your full code would look something like...
const GRID = 2;
const CELL = 1080 / GRID;

function setup() {
 createCanvas(1080, 1080);
 noStroke();
 // frameRate(2);
 noLoop();
}

function draw() {
 background(255, 255, 220);
 const cz = random(40, CELL);
 const sz = random(40, CELL);

 for (let gy = 0; gy < GRID; gy++) {

   for (let gx = 0; gx < GRID; gx++) {
     const cx = gx * CELL + CELL / 2;
     const cy = gy * CELL + CELL / 2;

     push();
     blendMode(MULTIPLY);
     fill('orange');
     circle(cx, cy, cz);
     pop();

     push();
     blendMode(MULTIPLY);
     translate(cx, cy);
     fill('pink');
     rectMode(CENTER);
     rect(0, 0, sz, sz);
     pop();
   }
 }
}

function keyPressed() {
  if (key === 's') {
    saveGif('mySketch', 5);
  }
}
Make a GIF and upload it to the class document.
Try experimenting with the For Loop by moving the variables for shapes sizes inside of it. And try adding more random variables to your sketch, such as rotating the square (rotate(random(TWO_PI));) or adding another shape. Adjust the colors and amount of shapes, blend modes, etc. to make your own moving pattern!
(some triangle code you can try...)
push();
translate(width/2, height/2); // move origin to canvas center
rotate(random(TWO_PI));       // random rotation
const s = random(300, 500);   // side length
const h = (sqrt(3) / 2) * s;  // height of equilateral triangle
fill('cyan');
triangle(-s/2, h/3, s/2, h/3, 0, -2*h/3);
pop();
Extra Credit:
Let’s use a more basic if statement, this time setting a variable to check if it’s night or day, and then adjusting the background color.
let isDaytime = false;

function setup() {
...
  const currentHour = hour();
  isDaytime = (currentHour >= 7 && currentHour < 19);
}

function draw() {

  if (isDaytime == true) {
    background('#fcf9d2ff');
  } else {
    background('#000022');
  }
This is an abbreviated example of how you may do this. Consider what else you may change by introducing time into your design.
Extra Extra Credit
Look into the linear interpolation (lerp) function, which is built into p5.js that allows you to create smooth transitions within animations. Try adding it to your design so it's smoother, and not flashing transitions.